Micropipette are essential tools in laboratories for accurately measuring and transferring small volumes of liquid. If you’re new to using one, setting the correct volume might seem tricky, but it’s actually quite simple. Here’s a step-by-step guide to help you set the volume on a micropipette.
Step 1: Understand the parts of the micropipette
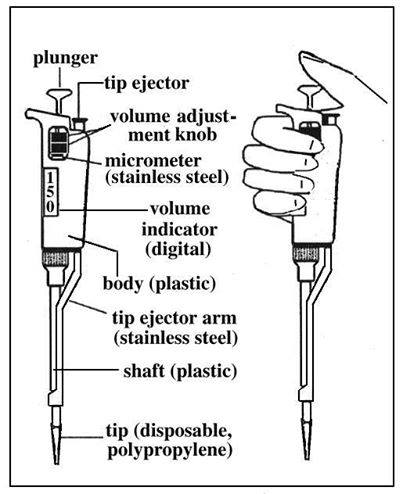
Before we start, let’s quickly go over the main parts of a micropipette:
- Plunger Button: The plunger button is pressed to draw up and release liquid, controlling the amount dispensed for accurate measurements.
- Volume Adjustment Knob: This control lets you adjust the volume to your preference. It is typically connected to the plunger button or situated just below it. You can raise or lower the volume by turning this knob, and the volume level will be shown in the digital display.
- Digital Volume Display: This small window displays the set volume, usually in microliters (µL), with three digits showing the precise volume, for example, 050 for 50 µL.
- Tip Ejector Button: After using the pipette, you’ll need to eject the disposable tip using the button to avoid touching it.
- Disposable Tip: This is the part of the micropipette that comes into contact with the liquid. It’s important to use a fresh tip for each measurement to avoid cross-contamination.

Step 2: Identify the Volume Range
Step 3: Adjust the Volume
- Hold the Micropipette upright in one hand.
- Turn the Volume Adjustment Knob gently. Twist it clockwise to decrease the volume or counterclockwise to increase it. Keep an eye on the digital volume display as the numbers change.
- Fine-tune the volume slowly as you reach the desired volume to prevent overshooting. The digital display will show the exact volume, usually in three digits (e.g., 050 represents 50 µL).
Step 4: Check the Setting
Double-check that the displayed volume is correct. It’s important to be precise, especially when working with small volumes, as even a tiny mistake can affect your results.
Step 5: Secure the Setting
Tips for Accurate Volume Setting
- Never Force the Knob: If the knob feels stuck, don’t force it. Forcing can damage the micropipette. Ensure you’re within the correct range.
- Adjust Slowly: When setting the volume, make small adjustments, especially as you get closer to the target.
- Regular Calibration: Over time, micropipettes can become less accurate. Regular calibration ensures that your volume settings are correct.

Importance of Correct Volume Setting in Experiments
Maintaining Your Micropipette
Regular maintenance of your micropipette ensures its longevity and accuracy. Here are some maintenance tips
- Remember to clean the micropipette regularly: After each use, wipe the exterior with a lint-free cloth. If you are working with hazardous materials, follow the appropriate decontamination procedures.
- Proper storage is important: When not in use, store your micropipette in a safe, upright position to prevent damage. Avoid placing it on its side, as this can affect its calibration.
- Service your micropipette periodically: Depending on usage, have it serviced by a professional technician. This involves checking for wear and tear, calibrating the instrument, and replacing any worn-out parts.
Setting the volume on a micropipette is a fundamental skill that every lab technician and scientist should master. By following the steps outlined in this blog post, you can ensure accurate volume settings, which are crucial for the success of your experiments.

